Beginners: Simple-Cheap Autoswitch LED Circuit - Mới bắt đầu: đơn giản, giá rẻ Autoswitch LED Circuit
"How do you make an LED turn on when it gets dark?" You might call it the "night-light problem," but the same sort of question comes up in a lot of familiar situations - emergency lights, street lights, etc.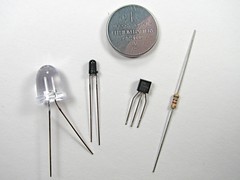
Solutions? Lots. The time-honored tradition is to use a circuit with a CdS photoresistor, sometimes called a photocell or LDR, for "light-dependent resistor." (Circuit Example 1, Example 2.) Photoresistors are reliable and cost about $1 each, but are going away because they contain cadmium, a toxic heavy metal whose use is increasingly regulated.
There are many other solutions as well. Look here for some op-amp based photodetector circuits with LED output, and check out some of the tricks used in well-designed solar garden lights, which include gems like using the solar cell itself as the sensor.
In this article we show how to build a very simple - perhaps even the simplest-- darkness-activated LED circuit. To our LED and battery we add just three components, which cost less than thirty cents altogether (and much less if you buy in bulk). You can build it in less than five minutes or less (much less with practice).
What can you do with such an inexpensive light-controlled LED circuit? Almost anything really. One fun application is to make LED Throwies that turn themselves off in the daytime to save power. Throwies normally can last up to two weeks. Adding a light-level switch like this can significantly extend their lifetime.

Figure 1: Schematic
When light falls on the photo-transistor, it begins to conduct up to about 1.5 mA, which pulls down the voltage at the lower side of the resistor by 1.5 V, turning off the transistor, which turns off the LED. When it's dark, the transistor is able to conduct about 15 mA through the LED. So, the circuit uses only about 1/10 as much current while the LED is off. One thing to note about this circuit: We're using a red LED. That's because the voltage drop across the transistor allows less than the full 3 V across the LED. The full three volts is really only marginal for driving blue LEDs anyway, so two-point-something really doesn't cut it.
Next, the photo-transistor. Note that it has a flatted side, much like an LED does. This pin on that side is the collector of the photo-transistor. Solder the collector (flatted side) to the middle pin (the base) of the transistor, again at 90 degrees. The other pin of the phototransistor, the emitter, is left unconnected for the moment. (Here is an alternate view of what that should look like when you're done.)
Finally, we need to add the LED. To do so, we need to know which side is the "positive," or anode side of the device. Regrettably markings of LEDs are not consistent, so the best way to be sure is to test it with the lithium coin cell - put the LED across the terminals of the cell and, when it lights up, note which side is touching the (+) terminal. (Usually, it's the one with the longer lead.) Solder the "positive" lead of the LED to the emitter pin of the transistor - it's the one on the left, which doesn't have anything soldered to it. Trim away the excess lead of the LED that goes past the solder joint. Solder the other pin of the LED (the "negative" pin, or cathode) to the emitter of the photo-transistor, the pin on the non-flatted side, which does not have anything connected to it yet.
Making a Throwie
To make this into an actual "throwie," you still need to add some tape and a magnet, but that's quite easily done. This one makes a pretty good nightlight attached to the top of a door frame - when the room lights are off, it shines a bright, bright spot on the ceiling.
While this little circuit can do something on its own, it would probably also be used as part of a larger circuit. At a minimum, note that if you work with batteries that have lower internal resistance than the lithium coin cells, you should place an appropriate resistor in series with the battery before trying to operate this circuit - or else you may put too much current through the LED. Certainly, this is one of the easiest and least expensive ways to control an LED with a photo-sensor.
Mới start:simple, giá rẻ Autoswitch LED Circuit
"Làm thế nào để bạn thực hiện một lần lượt LED khi trời tối?" Câu hỏi đặt ra trong rất nhiều tình huống quen thuộc, đèn khẩn cấp, đèn đường,đèn hỗ trợ bàn phím máy tính ngớ ngẩn, và danh sách đi về. Giải pháp? Nhiều. Truyền thống lâu đời là sử dụng một mạch với mộtphotoresistor CdS, đôi khi được gọi là một tế bào quang hoặc LDR, cho"điện trở phụ thuộc vào ánh sáng." (Circuit Ví dụ 1 Ví dụ 2.)Photoresistors là đáng tin cậy và chi phí khoảng $ 1, nhưng được đi xavì chúng có chứa cadmium, kim loại nặng độc hại có sử dụng ngày càng được quy định.
Có rất nhiều giải pháp khác như là tốt. Nhìn ở đây cho một số op-ampmạch dựa trên bộ tách sóng quang với đầu ra LED, và kiểm tra một sốcác thủ thuật được sử dụng trong thiết kế đèn sân vườn năng lượng mặt trời, trong đó bao gồm đá quý như sử dụng các tế bào năng lượng mặt trời của chính nó như cảm biến.
Trong bài này chúng tôi cho thấy làm thế nào để xây dựng một rất đơn giản - có lẽ ngay cả những đơn giản - bóng tối kích hoạt đèn LED mạch.Để LED và pin của chúng tôi, chúng tôi thêm ba thành phần, trong đó chi phí ít hơn ba mươi cent hoàn toàn (và ít hơn nhiều nếu bạn mua với số lượng lớn). Bạn có thể xây dựng nó trong vòng chưa đầy năm phút hoặc ít hơn (ít hơn nhiều với thực hành).
Những gì bạn có thể làm với một mạch rẻ tiền LED điều chỉnh ánh sáng? Hầu như bất cứ điều gì thực sự. Tuy nhiên, một trong những ứng dụng thú vị là làm cho throwies LED bật tự tắt vào ban ngày để tiết kiệm điện. Throwies thường có thể kéo dài hai tuần. Thêm một bộ chuyển mạch ánh sáng như thế này có thể mở rộng đáng kể đời sống của họ.
Làm 1 Throwie
Để thực hiện điều này vào một thực tế "throwie, bạn vẫn cần phải thêm một số băng và một nam châm, nhưng đó là khá dễ dàng thực hiện.Điều này làm cho một đèn ngủ khá tốt gắn liền với đầu của một khungcửa khi đèn phòng, nó tỏa sáng một điểm sáng, tươi sáng trên trần nhà.
Trong khi điều này mạch nhỏ có thể làm một cái gì đó của riêng mình,nó sẽ có thể cũng được sử dụng như là một phần của một mạch lớnhơn. Ở mức tối thiểu, lưu ý rằng nếu bạn làm việc với pin có sức đề kháng nội bộ thấp hơn so với các tế bào tiền xu lithium, bạn nên đặt mộtđiện trở thích hợp trong loạt với pin trước khi cố gắng để hoạt độngmạch này - hoặc người nào khác bạn có thể đặt quá nhiều hiện naythông qua LED. Chắc chắn, đây là một trong những cách dễ nhất và ít tốn kém nhất để kiểm soát một LED với cảm biến ảnh.
Điều này đầu tiên xuất hiện trong E V I L
No comments:
Post a Comment