Arduino Tutorial: Lesson 2: Blink blink bLiNk BLINK
This tutorial is by Limor Fried and from http://www.ladyada.net/learn/arduinoIntroduction
OK you've gotten your Arduino set up and also figured out how to use the software to send sketches to the board. Next step is to start writing your own sketches. We'll start off easy by just modifying something that already works.
To start we will venture deep into the Blink sketch, looking at each line and trying to understand what its doing.
Then we will start hacking the sketch!
Blinkie
Start up the Arduino software and open the Blink example sketch, as you did in Lesson 1.
The sketch itself is in the text input area of the Arduino software. Sketches are written in text, just like a document. When you select Compile/Verify from the menu, the Arduino software looks over the document and translates it to Arduino-machine-language - which is not human-readable but is easy for the Arduino to understand.
Sketches themselves are written in C, which is a programming language that is very popular and powerful. It takes a bit of getting used to but we will go through these examples slowly.
/*
 * Blink
 *
 * The basic Arduino example.  Turns on an LED on for one second,
 * then off for one second, and so on...  We use pin 13 because,
 * depending on your Arduino board, it has either a built-in LED
 * or a built-in resistor so that you need only an LED.
 *
 * http://www.arduino.cc/en/Tutorial/Blink
 */


int ledPin = 13;                // LED connected to digital pin 13

void setup()                    // run once, when the sketch starts
{
  pinMode(ledPin, OUTPUT);      // sets the digital pin as output
}


void loop()                     // run over and over again
{
  digitalWrite(ledPin, HIGH);   // sets the LED on
  delay(1000);                  // waits for a second
  digitalWrite(ledPin, LOW);    // sets the LED off
  delay(1000);                  // waits for a second
}
Comments
Lets examine this sketch in detail starting with the first section:
/*
 * Blink
 *
 * The basic Arduino example.  Turns on an LED on for one second,
 * then off for one second, and so on...  We use pin 13 because,
 * depending on your Arduino board, it has either a built-in LED
 * or a built-in resistor so that you need only an LED.
 *
 * http://www.arduino.cc/en/Tutorial/Blink
 */
This is a comment, it is text that is not used by the Arduino, its only there to help humans like us understand whats going on. You can tell if something is a comment because there is a /* at the beginning and a */ at the end. Anything between the /* and */ is ignored by the Arduino. In this example the person who wrote the comment decided to make it look pretty and add *'s down the side but this isn't necessary.
Variables
Lets look at the next line:
int ledPin = 13; // LED connected to digital pin 13
This is the first line of actual instruction code. It is also extremely unlike English (or any other human language). The first part we can easily understand is the part to the right, which is also a comment. Turns out if you want to make a small comment, you can use // as well as /* */. // is often used for short, one line comments.
The rest of the line, the stuff before the //, is what is called a statement, which is basically like a computerized sentence. Much like human sentances end with a . (period), all computer sentences end with a ; (semicolon)
OK all we have left is the statement itself, which turns out to be a sentence telling the computer that we would like it to create a box named ledPin and to put the number 13 in that box. If you remember your math, you may recall that the box is also known as variable.
box-type
|
box-name
|
=
|
stuff-to-put-in-box
|
|---|---|---|---|
int
|
ledPin
|
=
|
13
|
The first part of this sentence is int, which is short for integer which is a fancy way of saying whole number.
The third part is an =, which basically says that the variable (box) named ledPin should start out equaling whatever is after the =.
The fourth part is 13, a whole number (integer) which is assigned to ledPin.
Procedures
Lets move on to the next section
void setup()                    // run once, when the sketch starts
{
  pinMode(ledPin, OUTPUT);      // sets the digital pin as output
}
OK we've got two comments, each starting with //. We understand comments already so lets skip that.
We also see in the middle there is a statement, we know it's a statement because it ends with a ; (semicolon) however there's a whole bunch more stuff before and after it.
This bunch of code is an example of a procedure, a procedure is a collection of statements, its used to group statements together so that we can refer to them all with one name. Its just like a procedure that we use to perform a task step by step.
returned value
|
procedure name
|
(input values)
|
{ statements }
|
|---|---|---|---|
void
|
setup
|
()
|
{ pinMode(ledPin, OUTPUT); }
|
To better understand procedures, lets use an analogy to the kinds of procedures we're used to.
clean cat wash the cat(dirty cat)                    // a procedure for washing the cat
{
 turn on the shower.
 find the cat.
 grab the cat.
 put cat under shower.
 wait 3 minutes.                                     // wait for cat to get clean.
 release cat.
}
This is a procedure for washing the cat. The name of the procedure is wash the cat, it uses a dirty cat as the input and returns a clean cat upon success. There are two brackets, an open bracket { and a closed bracket }, that's are used to indicate the beginning and end of the procedure. Inside the procedure are a bunch of statements, indicating the correct procedure for washing a cat. If you perform all of the statements then you should be able to turn a dirty cat into a clean cat.
Looking again at the procedure, we see that it is named setup and it has no input values and it returns void. Now you're probably asking yourself "what is void?" Well thats a computer-scientist way of saying nothing. That is, this procedure doesnt return anything. (That doesnt mean it doesn't do anything, just that it doesn't have a tangible number or whatever, to show when its complete).
void setup() // run once, when the sketch starts
There is one statement in this procedure,
pinMode(ledPin, OUTPUT); // sets the digital pin as output
We'll return to this statement in detail later, suffice to say it is a way of telling the Arduino what we would like to do with one of the physical pins on the main processor chip.
Procedure calls
We're onto the next bunch of text..
void loop()                     // run over and over again
{
  digitalWrite(ledPin, HIGH);   // sets the LED on
  delay(1000);                  // waits for a second
  digitalWrite(ledPin, LOW);    // sets the LED off
  delay(1000);                  // waits for a second
}
Using our now well-honed technique we recognize that the text to the right is all comments. We also recognize another procedure, this one called loop which also has no inputs or output. This procedure has multiple statements, one after the other.
We're going to skip the first statement for now and go straight to statement #2.
The second and fourth statements are the same, and have something to do with a delay. This statement is very similar to the "wait 3 minutes." command in our cat-washing procedure. This statement says "Dear Arduino. Stop what you're doing for a short amount of time. Thanks!"
To do this, the statement performs a procedure call. (We will use the phrasing calls a procedure). Basically, we want the Arduino to take a break but don't quite know how to do it, lucky for us, someone else wrote a procedure called delay which we can call upon to do the work for us. Kind of like if we need to do our taxes and we dont know how, we call upon an accountant to do it for us, giving them the paperwork input and getting tax return as the result.
procedure name
|
(input values)
|
;
|
|---|---|---|
delay
|
(1000)
|
;
|
This means that somewhere out there, there's a procedure something like this:
void delay(number of milliseconds)
{
  "Dear Arduino. Stop what you're doing for (number of milliseconds) amount of time. Thanks!"
}
Turns out this delay procedure works pretty well, and all we have to do is tell it how many milliseconds (1/1000th of a second) to wait and it will do the job for us.
Returning to the first statment, we see that it is also a procedure call. This time for some procedure called digitalWrite. We'll also skip this one in detail for a bit, except to explain that its turning a pin on the Arduino chip on and off, and that pin is powering the LED so in essence its turning the LED on and off.
Special Procedures - Setup() and Loop()
I do want to mention quickly here that the two procedures we've mentioned so far are extra-special in that when the Arduino first wakes up after being reset, it always does whats in the setup procedure first. Then it does whatever is in the loop procedure over and over and over...forever! Or at least until you turn it off.
Modifying the example
Now that we've analyzed the entire program it's time to make some changes. In your Arduino software, change the number in the delay procedure calls to 500 (from 1000) as shown
void loop()                     // run over and over again
{
  digitalWrite(ledPin, HIGH);   // sets the LED on
  delay(500);                  // waits for a second
  digitalWrite(ledPin, LOW);    // sets the LED off
  delay(500);                  // waits for a second
}
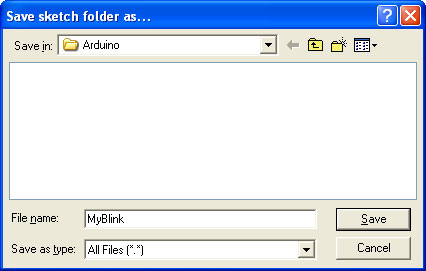
If you try to save the sketch, you'll get the warning that it's read-only.

Not a big deal, you can save it under a new name, such as MyBlink.
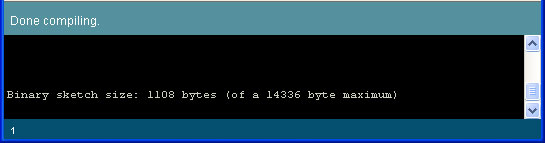
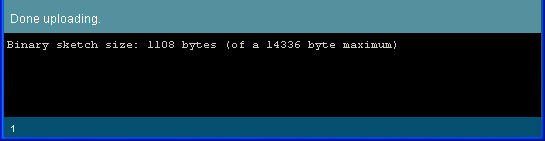
Compile/Verify the sketch and Upload it, using your Lesson 1 techniques.
Once the Arduino has been updated with the new sketch you should see a faster-blinking light than before
If the LED is not blinking faster, check:
- Did you make the changes to the delay procedure call to make it 500?
- Did the compile/verify complete successfully? (should look like the screenshot above)
- Did the upload complete successfully? (should look like the screenshot above)
Exercises
Now it time for you to make modifications to the sketch and experiment with different delay values
Exercise 1.
Modify the code so that the light is on for 100 msec and off for 900 msec
Exercise 2.
Modify the code so that the light is on for 50 msec and off for 50 msec. What happens? (Highlight the text below to see the answer)
Intense strobe action!
Exercise 3.
Modify the code so that the light is on for 10 ms and off for 10 ms. What happens? (Highlight the text below to see the answer)
The light is no longer blinking
Now pick up the Arduino and gently wave it back and forth, in a dark room. What happens? (Highlight the text below to see the answer)
The LED creates a dashed trail of light in the air. z
What do you think is happening here? (Highlight the text below to see the answer)
The LED is blinking, but its blinking so fast that our eyes can't pick it up, so it looks like a blur. When the Arduino is waved in the air, we see streaks of light from the blinks.
Wrap up
Congrats, you have finished the second lesson!
In this lesson you examined the Blink sketch in detail, and learned a bit of the language used to talk to the Arduino. You also learned how to modify a sketch, and practiced uploading sketches to the Arduino some more.
Arduino Hướng dẫn: Bài 2: Blink chớp chớp chớp
Giới thiệuOK, bạn đã nhận được Arduino của bạn thiết lập và cũng đã tìm ra làm thế nào để sử dụng phần mềm để gửi bản phác thảo cho hội đồng quản trị. Bước tiếp theo là bắt đầu viết bản phác thảo của riêng bạn. Chúng tôi sẽ bắt đầu dễ dàng bởi chỉ cần thay đổi một cái gì đó đã hoạt động.
Để bắt đầu chúng tôi sẽ dấn sâu vào các ký họa Blink, nhìn vào mỗi dòng và cố gắng để hiểu những gì mình làm.
Sau đó, chúng tôi sẽ bắt đầu hack các ký họa!
Blinkie
Bắt đầu phần mềm Arduino và mở phác thảo Blink ví dụ, như bạn đã làm trong bài 1.
Phác họa chính nó là trong vùng nhập văn bản của phần mềm Arduino. Phác thảo được viết bằng văn bản, giống như một tài liệu. Khi bạn chọn Biên dịch / Xác minh từ menu, phần mềm Arduino nhìn qua các tài liệu và dịch Arduino ngôn ngữ máy mà không phải là con người có thể đọc được nhưng dễ dàng cho Arduino để hiểu.
Phác thảo tự được viết bằng C, mà là một ngôn ngữ lập trình là rất phổ biến và mạnh mẽ. Nó có một chút nhận được sử dụng nhưng chúng tôi sẽ đi qua các ví dụ từ từ.
/*
 * Blink
 *
 * The basic Arduino example.  Turns on an LED on for one second,
 * then off for one second, and so on...  We use pin 13 because,
 * depending on your Arduino board, it has either a built-in LED
 * or a built-in resistor so that you need only an LED.
 *
 * http://www.arduino.cc/en/Tutorial/Blink
 */


int ledPin = 13;                // LED connected to digital pin 13

void setup()                    // run once, when the sketch starts
{
  pinMode(ledPin, OUTPUT);      // sets the digital pin as output
}


void loop()                     // run over and over again
{
  digitalWrite(ledPin, HIGH);   // sets the LED on
  delay(1000);                  // waits for a second
  digitalWrite(ledPin, LOW);    // sets the LED off
  delay(1000);                  // waits for a second
}
Bình luận
Cho phép kiểm tra này phác thảo chi tiết bắt đầu với phần đầu tiên:
/*
 * Blink
 *
 * The basic Arduino example.  Turns on an LED on for one second,
 * then off for one second, and so on...  We use pin 13 because,
 * depending on your Arduino board, it has either a built-in LED
 * or a built-in resistor so that you need only an LED.
 *
 * http://www.arduino.cc/en/Tutorial/Blink
 */
Đây là một nhận xét, nó là văn bản không được sử dụng bởi Arduino, chỉ ở đó để giúp đỡ con người như chúng tôi hiểu những gì đang diễn ra của nó. Bạn có thể cho biết nếu một cái gì đó là một bình luận vì là một * / ở đầu và * / ở cuối. Bất cứ điều gì giữa / * và * / được bỏ qua bởi Arduino. Trong ví dụ này, người viết bình luận quyết định để làm cho nó trông xinh đẹp và thêm * xuống bên, nhưng điều này là không cần thiết.
Ý kiến rất hữu ích và tôi mạnh mẽ khuyến khích tất cả các phác thảo, bạn có một ý kiến trong đầu với thông tin như người đã viết nó, khi bạn đã viết nó và những gì phải làm.
Biến
Cho phép xem xét các dòng tiếp theo:
int ledPin = 13; // LED connected to digital pin 13
Đây là dòng đầu tiên của mã hướng dẫn thực tế. Nó cũng là cực kỳ không giống như tiếng Anh (hoặc bất kỳ ngôn ngữ khác của con người). Phần đầu tiên chúng ta có thể dễ dàng hiểu được là một phần đúng, thì đó cũng là một bình luận. Hóa ra nếu bạn muốn thực hiện một bình luận nhỏ, bạn có thể sử dụng / / cũng như / ** / / / Thường được sử dụng cho ngắn hạn, bình luận dòng.
Phần còn lại của đường dây, các công cụ trước khi / /, là những gì được gọi là một tuyên bố, đó là cơ bản giống như một câu máy vi tính. Giống như con người sentances kết thúc với một. (Thời gian), tất cả các câu máy tính kết thúc với một; (dấu chấm phẩy)
OK tất cả chúng ta đã để lại là tuyên bố (statement) chính nó, mà hóa ra lại là một câu nói cho máy tính mà chúng tôi muốn nó để tạo ra một hộp có tên là ledPin và đưa số 13 vào ô đó. Nếu bạn nhớ toán học của bạn, bạn có thể nhớ lại rằng hộp cũng được biết đến như là một biến.
box-type
|
box-name
|
=
|
stuff-to-put-in-box
|
|---|---|---|---|
int
|
ledPin
|
=
|
13
|
Phần thứ hai của câu này được ledPin là tên của hộp.
Phần thứ ba là một =, mà về cơ bản nói rằng biến (hộp) đặt tên là ledPin nên bắt đầu bằng bất cứ điều gì sau khi =.
Phần thứ tư là 13, một số nguyên (integer) được giao để ledPin.
Thủ tục
Cho phép di chuyển sang phần tiếp theo
void setup()                    // run once, when the sketch starts
{
  pinMode(ledPin, OUTPUT);      // sets the digital pin as output
}
OK chúng ta đã có hai ý kiến, bắt đầu với / /. Chúng tôi hiểu Bình luận do đó, cho phép bỏ qua.
Loạt các mã này là một ví dụ của một thủ tục (procedure), thủ tục là một bộ sưu tập của báo cáo, được sử dụng để báo cáo nhóm với nhau để chúng ta có thể tham khảo tất cả với một tên. Giống như một thủ tục mà chúng ta sử dụng để thực hiện một bước công việc bước.step.
.
returned value
|
procedure name
|
(input values)
|
{ statements }
|
|---|---|---|---|
void
|
setup
|
()
|
{ pinMode(ledPin, OUTPUT); }
|
clean cat wash the cat(dirty cat)                    // a procedure for washing the cat
{
 turn on the shower.
 find the cat.
 grab the cat.
 put cat under shower.
 wait 3 minutes.                                     // wait for cat to get clean.
 release cat.
}
Đây là một thủ tục để rửa con mèo. Tên của thủ tục là rửa con mèo (wash the cat), nó sử dụng một con mèo bẩn như là đầu vào và trả về một con mèo sạch sẽ sau khi thành công. Có hai dấu ngoặc, mở một dấu ngoặc {và đóng khung}, thats được sử dụng để chỉ bắt đầu và kết thúc của thủ tục. Bên trong thủ tục là một loạt các báo cáo, cho biết thủ tục chính xác để làm sạch một con mèo. Nếu bạn thực hiện tất cả các báo cáo sau đó bạn sẽ có thể biến một con mèo bẩn vào một con mèo sạch sẽ.
Nhìn một lần nữa thủ tục, chúng ta thấy rằng nó được đặt tên là thiết lập (setup) và nó không có giá trị đầu vào và trả về (làm mất hiệu lực) void. Bây giờ bạn có lẽ đang tự hỏi "void (làm mất hiệu lực) là những gì?" Well thats một cách máy tính nhà khoa học nói rằng không (nothing) có gì. Đó là, thủ tục này không trả lại bất cứ điều gì. (Điều đó không có nghĩa là nó không làm bất cứ điều gì, chỉ là nó không có một số hoặc bất cứ điều gì hữu hình, để hiển thị khi nó hoàn thành)
void setup() // run once, when the sketch starts
Có một statment trong thủ tục này,
pinMode(ledPin, OUTPUT); // sets the digital pin as output
Chúng tôi sẽ trở về tuyên bố này một cách chi tiết sau đó, đủ để nói nó là một cách nói cho Arduino những gì chúng tôi muốn làm với một trong các chân vật lý trên các chip xử lý chính.
Thủ tục cuộc gọi.Chúng tôi đang vào bó tiếp theo của văn bản..
void loop()                     // run over and over again
{
  digitalWrite(ledPin, HIGH);   // sets the LED on
  delay(1000);                  // waits for a second
  digitalWrite(ledPin, LOW);    // sets the LED off
  delay(1000);                  // waits for a second
}
Sử dụng kỹ thuật của chúng tôi, mài, chúng tôi nhận ra rằng các văn bản bên phải là tất cả. Chúng tôi cũng nhận ra một thủ tục khác, điều này được gọi là vòng lặp (loop) mà cũng không có đầu vào hay đầu ra. Thủ tục này có nhiều báo cáo, một sau khi khác.
Chúng tôi sẽ bỏ qua các tuyên bố đầu tiên cho bây giờ và đi thẳng vào câu lệnh # 2.
Báo cáo thứ hai và thứ tư là như nhau, và có một cái gì đó để làm với một sự chậm trễ. Tuyên bố này là rất tương tự như "chờ 3 phút." lệnh trong thủ tục con mèo rửa của chúng tôi. Tuyên bố này nói rằng "thân mến Arduino những gì bạn đang làm cho một khoảng thời gian ngắn. Cảm ơn!"
Để làm điều này, tuyên bố thực hiện một cuộc gọi thủ tục. (Chúng tôi sẽ sử dụng cách phân nhịp các cuộc gọi một thủ tục). Về cơ bản, chúng tôi muốn Arduino để nghỉ ngơi, nhưng không biết làm thế nào để làm điều đó, may mắn cho chúng ta, ai đó đã viết một thủ tục chậm trễ mà chúng ta có thể kêu gọi để làm công việc cho chúng tôi. Loại như nếu chúng ta cần phải làm thuế của chúng tôi và chúng tôi không biết làm thế nào, chúng tôi kêu gọi một kế toán để làm điều đó cho chúng tôi, cho họ đầu vào thủ tục giấy tờ và nhận được trả lại thuế theo kết quả.
procedure name
|
(input values)
|
;
|
|---|---|---|
delay
|
(1000)
|
;
|
void delay(number of milliseconds)
{
  "Dear Arduino. Stop what you're doing for (number of milliseconds) amount of time. Thanks!"
}
Hóa ra thủ tục chậm trễ này hoạt động khá tốt, và tất cả chúng ta phải làm là nói cho nó bao nhiêu mili giây (1/1000th của một giây) để chờ đợi và nó sẽ làm công việc cho chúng tôi.
Trở về đến statment đầu tiên, chúng ta thấy rằng nó cũng là một cuộc gọi thủ tục. Thời gian này đối với một số thủ tục gọi là digitalWrite. Chúng tôi cũng sẽ bỏ qua một chi tiết cho một chút, ngoại trừ việc giải thích rằng biến một pin trên chip Arduino và tắt, và rằng pin được cung cấp năng lượng LED như vậy trong bản chất của nó biến LED trên và tắt.
Thủ tục đặc biệt - Setup () và Loop ()
Tôi không muốn đề cập đến một cách nhanh chóng ở đây là hai thủ tục chúng tôi đã đề cập đến nay là ngoài đặc biệt trong khi người đầu tiên Arduino tỉnh dậy sau khi được thiết lập lại, nó luôn luôn làm những gì trong các thủ tục thiết lập (setup) đầu tiên. Sau đó, nó bất cứ điều gì trong các thủ tục vòng lặp (loop) và hơn và hơn ... mãi mãi! Hoặc ít nhất là cho đến khi bạn tắt nó đi.
Sửa đổi ví dụ
Bây giờ chúng ta đã phân tích toàn bộ chương trình đó là thời gian để thực hiện một số thay đổi. Trong phần mềm Arduino của bạn, thay đổi số trong các thủ tục trì hoãn (delay) các cuộc gọi đến 500 (từ 1000) như được hiển thị.
void loop()                     // run over and over again
{
  digitalWrite(ledPin, HIGH);   // sets the LED on
  delay(500);                  // waits for a second
  digitalWrite(ledPin, LOW);    // sets the LED off
  delay(500);                  // waits for a second
}
Nếu bạn cố gắng để lưu các bản phác thảo, bạn sẽ nhận được cảnh báo rằng đó là chỉ đọc.
Không phải là một việc lớn, bạn có thể lưu nó dưới một tên mới, chẳng hạn như MyBlink.
Biên dịch / Xác minh các ký họa và tải lên nó, bằng cách sử dụng các bài học của bạn 1 kỹ thuật.
Một khi Arduino đã được cập nhật với các bản phác thảo mới, bạn sẽ thấy một ánh sáng nhấp nháy nhanh hơn so với trước đây
Nếu LED không nhấp nháy nhanh hơn, kiểm tra:
- Bạn thực hiện những thay đổi để các thủ tục chậm trễ (delay) gọi để làm cho nó 500?
- Đã biên dịch / xác minh hoàn thành thành công? (Nên trông giống như hình trên)
- Đã tải lên hoàn thành thành công? (Nên trông giống như hình trên)
Các bài tập
Bây giờ là thời gian để bạn có thể sửa đổi để phác thảo và thử nghiệm với các giá trị chậm trễ khác nhau
Tập thể dục 1.
Sửa đổi mã để ánh sáng là 100 mili giây và 900 msec
Tập thể dục 2.
Sửa đổi mã để ánh sáng là 50 mili giây và 50 msec. Điều gì sẽ xảy ra?(Đánh dấu văn bản dưới đây để xem câu trả lời)
Intense strobe hành động!
Tập thể dục 3.
Sửa đổi mã để ánh sáng là 10 ms và 10 ms. Điều gì sẽ xảy ra?(Đánh dấu văn bản dưới đây để xem câu trả lời)
Ánh sáng không còn nhấp nháy
Bây giờ nhận Arduino và nhẹ nhàng vẫy tay qua lại, trong một phòng tối. Điều gì sẽ xảy ra?(Đánh dấu văn bản dưới đây để xem câu trả lời)
LED tạo ra một vệt đứt nét của ánh sáng trong không khí. z
Bạn có nghĩ rằng đang xảy ra ở đây? (Đánh dấu văn bản dưới đây để xem câu trả lời)
LED nhấp nháy, nhưng quá nhanh đôi mắt của chúng ta không thể nhặt nó lên nhấp nháy của nó, để nó trông giống như mờ. Khi Arduino được vẫy tay trong không khí, chúng ta nhìn thấy vệt ánh sáng nhấp nháy.
Quấn lên
Chúc mừng, bạn đã hoàn thành bài học thứ hai!
Trong bài học này, bạn kiểm tra các ký họa Blink chi tiết, và đã học được một chút ngôn ngữ được sử dụng để nói chuyện với Arduino. Bạn cũng đã học được làm thế nào để sửa đổi một bản phác thảo, và thực hành các bản phác tải lên các Arduino một số chi tiết.
No comments:
Post a Comment