Arduino: ISP Shield - Arduino: ISP lá chắn
It lets you use your Arduino (or shield-compatible clone, such as the Diavolino) as an AVR ISP programmer, for example to burn bootloaders onto "raw" AVR chips, directly within the Arduino programming environment, either in the provided ZIF socket or on an external target board.
Nó cho phép bạn sử dụng Arduino của bạn (hoặc bản sao lá chắn tương thích, như các Diavolino) như là một ISP AVR lập trình, ví dụ như để ghicác bộ nạp khởi động vào chip AVR "nguyên liệu", trực tiếp trong môi trường lập trình Arduino, hoặc trong các ổ cắm ZIF cung cấp hoặctrên một bảng mục tiêu bên ngoài.

The circuit is designed to be compatible with the "Arduino as ISP" option in recent versions of the Arduino IDE. It is based on a number of prior hardware implementations, most closely the version by Andre Knoerig at Fritzing.
Mạch được thiết kế để tương thích với các tùy chọn "Arduino như ISP"trong các phiên bản gần đây của IDE Arduino. Nó dựa trên một số trước khi triển khai phần cứng, chặt chẽ nhất các phiên bản bởi Andre Knoerigtại Fritzing.
This tutorial explains how to use an Arduino board as an AVR ISP (in-system programmer). This allows you to use the board to burn the bootloader onto an AVR (e.g. the ATmega168 or ATmega328 used in Arduino). The code in this example is based on the mega-isp firmware by Randall Bohn.
Sử dụng một Arduino như là một ISP AVR (trong hệ thống lập trình)
Hướng dẫn này giải thích làm thế nào để sử dụng một hội đồng quản trịArduino như là một ISP AVR (trong hệ thống lập trình). Điều này chophép bạn sử dụng bảng ghi các bộ nạp khởi động vào một AVR (ví dụ như các ATmega168 ATmega328 sử dụng trong Arduino). Các mã trongví dụ này được dựa trên phần mềm mega-isp bởi Randall Bohn.
Hướng dẫn này giải thích làm thế nào để sử dụng một hội đồng quản trịArduino như là một ISP AVR (trong hệ thống lập trình). Điều này chophép bạn sử dụng bảng ghi các bộ nạp khởi động vào một AVR (ví dụ như các ATmega168 ATmega328 sử dụng trong Arduino). Các mã trongví dụ này được dựa trên phần mềm mega-isp bởi Randall Bohn.
Instructions
To use your Arduino board to burn a bootloader onto an AVR, you need to follow a few simple steps.
- Open the ArduinoISP firmware (in Examples) to your Arduino board.
- Note for Arduino 1.0: you need to make one small change to the ArduinoISP code. Find the line in the heartbeat() function that says "delay(40);" and change it to "delay(20);".
- Select the items in the Tools > Board and Serial Port và các menu that correspond to the board you are using as the programmer (not the board being programmed).
- Upload the ArduinoISP sketch.
- Wire your Arduino board to the target as shown in the diagram below. (Note for the Arduino Uno: you'll need to add a 10 uF capacitor between reset and ground.)
- Select the item in the Tools > Board menu that corresponds to the board on which you want to burn the bootloader (not the board that you're using as the programmer). See the board descriptions on the environment page for details.
- Use the Burn Bootloader > Arduino as ISP command.
Hướng dẫn
Để sử dụng Arduino hội đồng quản trị của bạn để ghi một bootloader nạp khởiđộng vào một AVR, bạn cần phải làm theo một vài bước đơn giản.
Để sử dụng Arduino hội đồng quản trị của bạn để ghi một bootloader nạp khởiđộng vào một AVR, bạn cần phải làm theo một vài bước đơn giản.
- Mở phần mềm ArduinoISP (trong ví dụ) để hội đồng quản trị Arduino củabạn.
- Lưu ý cho Arduino 1.0: bạn cần phải thực hiện một thay đổi nhỏ để mã ArduinoISP. Tìm dòng trong nhịp tim () chức năng nói rằng "delay(40);" "và thay đổi nó để "delay(20);" .
- Chọn các mục trong Tools > Board và các menu Serial Porttư ơng ứng với hội đồng quản trị bạn đang sử dụng như các lập trình viên (không phải hội đồng quản trị được lập trình).
- Tải lên các bản phác thảo ArduinoISP.
- Dây Arduino hội đồng quản trị của bạn cho các mục tiêu như thể hiện trong sơ đồ dưới đây. (Lưu ý cho Uno Arduino: bạn sẽ cần phải thêm một tụ điện UF 10 giữa thiết lập lại và mặt đất)
- Chọn mục Tools> Hội đồng quản trị trình đơn tương ứng với hội đồng quản trị mà bạn muốn ghi các bootloader nạp khởi động (không phải là hội đồng quản trị mà bạn đang sử dụng như một lập trình). Xem mô tả hội đồng quản trị trên trang môi trường để biết thêm chi tiết.
- Sử dụng Burn Bootloader> Arduino như ISP lệnh.
Circuit (targeting Arduino Uno, Duemilanove, or Diecimila)
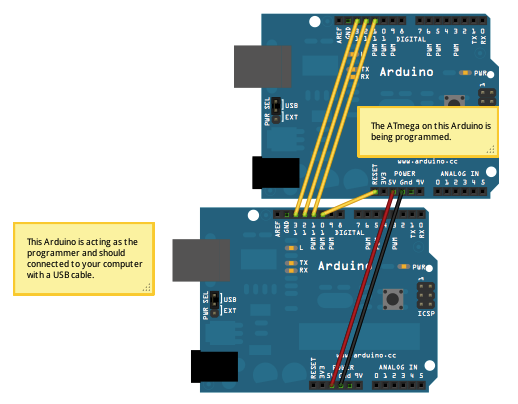
An Arduino board serving as an ISP to program the ATmega on another Arduino board. On the Arduino Uno, you'll need to connect a 10 uF capacitor between reset and ground (after uploading the ArduinoISPsketch). Note that you need access to the reset pin on the target board, which isn't available on NG or older boards.
Circuit (nhắm mục tiêu Arduino Uno, Duemilanove, hoặc Diecimila)
Một hội đồng quản trị Arduino phục vụ như một ISP chương trình ATmega trên một hội đồng quản trị Arduino. Uno Arduino, bạn sẽ cần phải kết nối một tụ UF 10 giữa thiết lập lại và mặt đất (sau khi tải lên ArduinoISPsketch). Lưu ý rằng bạn cần truy cập vào pin đặt lại trên bảng mục tiêu, mà không có sẵn trên bảng NG trở lên.
Circuit (targeting Arduino NG or older)
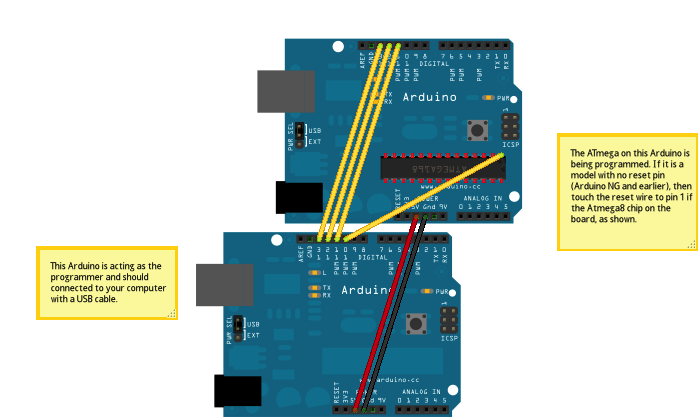
On NG or older boards, connect the reset wire to pin 1 of the Atmega chip on the board, as shown above.
Circuit (targeting an AVR on a breadboard)
See the Arduino to Breadboard tutorial for details. < http://arduino.cc/en/Tutorial/ArduinoToBreadboard >
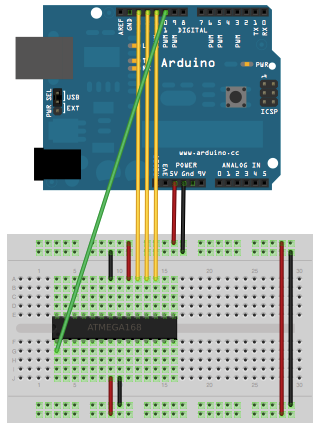
Using an Arduino board to program an ATmega. Because no external clock source is connected, the ATmega must be configured to use its internal clock.
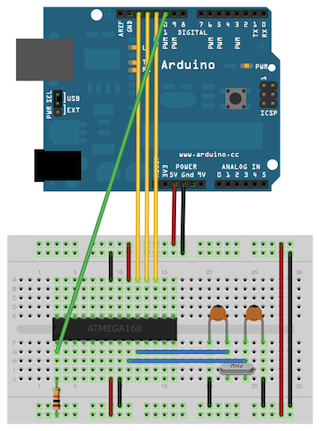
Using an Arduino board to program an ATmega, with external crystal and associated capacitors (18 or 22 picofarads).
Readers are urged to consult the original documentation: < http://arduino.cc/en/Tutorial/ArduinoISP >. This is provided so Vietnamese speaking people can refer to the original English.
No comments:
Post a Comment